AWS Load Balancer Controller and a Simple Flask app
-
Myron Zaiets
- 24 Aug, 2023
- 02 Mins read

Hi,
In this article, I want to show you how to use the AWS Load Balancer Controller and expose a simple Flask app via an Ingress.
The AWS Load Balancer Controller is used to provision Ingress. More about AWS LBC you find here: https://kubernetes-sigs.github.io/aws-load-balancer-controller/v2.6/
OK, let’s get started.
Firstly, we need to install our EKS cluster, and here is our config.yaml:
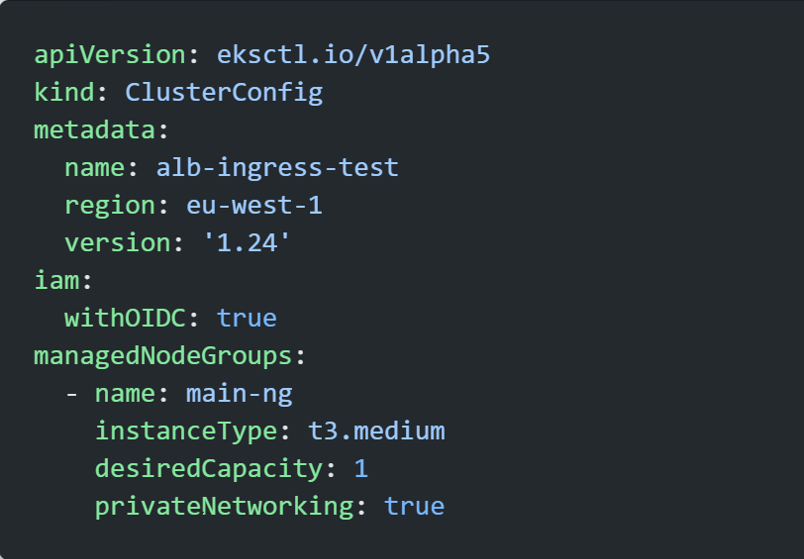
I used eksctl, as it’s a straightforward tool in case you need to create an EKS cluster as fast as possible. I will make a cluster with one node. Also, the CloudFormation template will be provisioned with all the needed resources like subnets, NAT gateway, Internet gateway, and so on.
The command to install it is:
eksctl create cluster -f config.yaml
After we have our EKS cluster created, we will switch to the second step.
Secondly, we need to install AWS Load Balancer Controller. All the needed steps are here: https://docs.aws.amazon.com/eks/latest/userguide/aws-load-balancer-controller.html
Just to sum them up:
We need to create IAM OIDC identity provider. Use these commands:
export cluster_name=my-cluster
oidc_id=$(aws eks describe-cluster --name $cluster_name --query "cluster.identity.oidc.issuer" --output text | cut -d '/' -f 5)
aws iam list-open-id-connect-providers | grep $oidc_id | cut -d "/" -f4
If you have some output after the last command, you have OIDC installed.
Create Iamserviceaccount for our Controller, instruction is here: https://docs.aws.amazon.com/eks/latest/userguide/aws-load-balancer-controller.html
Install AWS Load Balancer Controller by using Helm, and again the instruction is in the previous link.
Now, that we have everything installed, let’s check our cluster.

Our load balancer controller is installed. It consists of 2 pods.
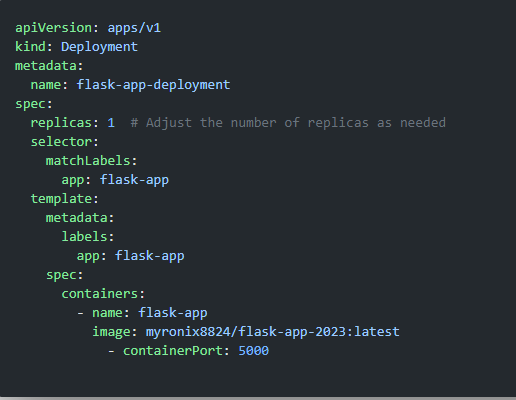
Also, we have our simple Flask app installed. Here is our deployment.yaml.
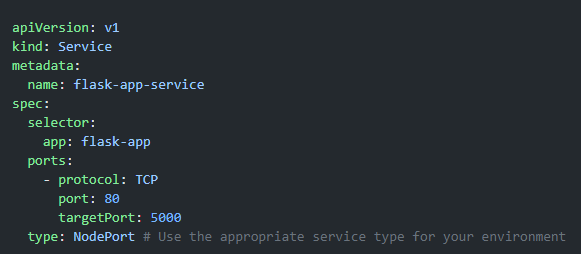
Here is our service.yaml.
The next step is to provision our Ingress resource. Our ALB will be provisioned after we create an Ingress. Let’s create a manifest:
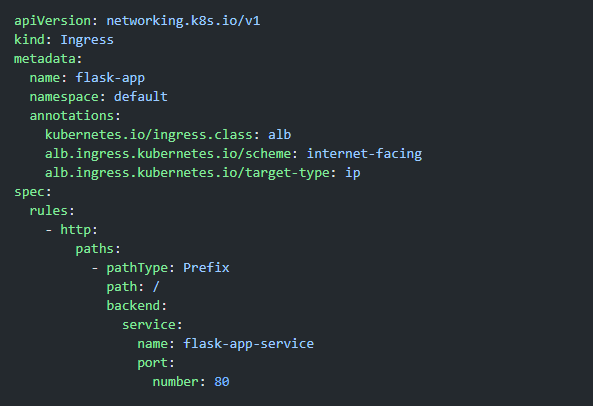
Let’s apply it, and see what we have:
**kubectl apply -f .\ingress.yaml **
Our ingress is created:

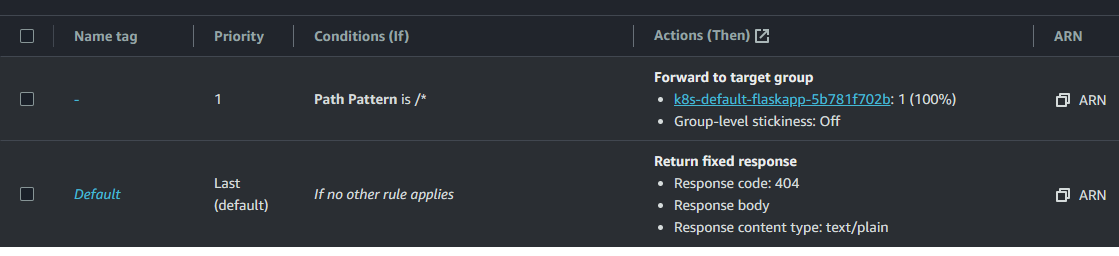
Our ALB was also created, let’s check the listeners. As we can see, the traffic is routed to our flask target group:
Let’s put the DNS of our Load Balancer to a web browser:
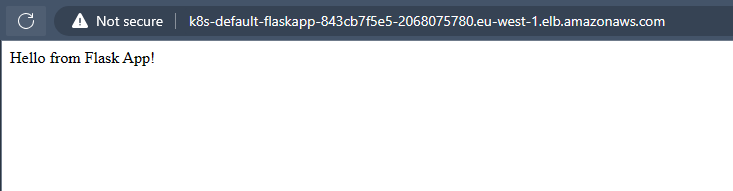
Everything is working fine. We can access our app and see the static message. In this post, I described the scenario, where we leveraged the AWS Load Balancer Controller, and we also accessed the simple web app by using ALB.
To delete a cluster, use this command: ** eksctl delete cluster -f config.yaml**
Thank you for your time.
Bye:)