Azure Virtual Desktop - Deploy with Terraform
-
Denis Dal Molin
- 13 Oct, 2023
- 19 Mins read
Azure Virtual Desktop: deploy con Terraform
[Versione italiana di seguito]
**Disclaimer: **Many of our customers have confidentiality agreements safeguarding their brand names from commercial purposes. Hence, you may encounter references such as “Client Name Confidential”, or the customer’s industry instead of the customer’s brand name.
Welcome to this blog article in which we will explore the deployment of an Azure Virtual Desktop infrastructure without using the classic graphical administration console we are used to in Azure but rather via code by means of Terraform.
Terraform is an open-source tool for managing infrastructure as code (IaC), which means we will be able to create and modify infrastructure in a declarative, predictable and intuitive way.
The idea behind IaC is to code the entire infrastructure creation process. Terraform allows us to define resources using a high-level language, making it readable even for those who are not programming experts. This language is called HCL (HashiCorp Configuration Language).
Throughout this article, we will guide you through the following configurations using Terraform:
- Creating an Azure Resource Group
- Configuring network resources in Azure
- Implementing the core components of Azure Virtual Desktop
- Creating Azure Virtual Desktop Session Hosts (with Azure AD Join)
For now, we will not address more advanced details, such as using a service principal with API permissions to connect to Azure, using a storage account to host the shares needed for FSLogix profiles, creating custom virtual machines from an image via Azure Compute Gallery, and assigning RBAC Azure AD roles to resources
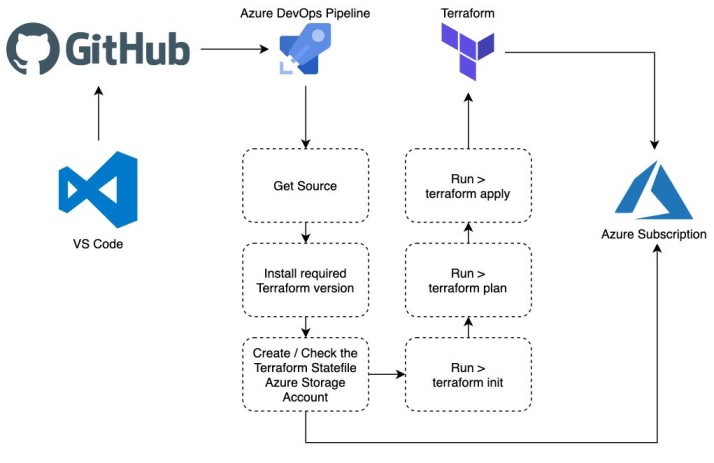
Terraform Principal Uses
Terraform is usually used to:
- Resources and Infrastructure Administrative management
- Infrastructure deployment *| Infrastructure automation
It is important to note that Terraform is not usually used as a Disaster Recovery (DR) plan for a serious of unprofitable considerations.
Usually, when the decision is made to use Terraform, the ability to create cloud resources and objects through the portal is disabled. This is due to the fact that Terraform takes care of the entire lifecycle, starting from the provisioning phase, going through configuration, and finally reaching the decommissioning phase, making manual management of resources through the portal unnecessary.
Terraform Bases
To deploy resources on Azure you need to define the provider in the terraform files.
For each resource you want to deploy using Terraform there is a specific syntax to use. In the following example you can see the syntax for creating a storage account.
resource "azurerm_storage_account" "example" {
  name                     = "storageaccountname"
  resource_group_name      = azurerm_resource_group.example.name
  location                 = azurerm_resource_group.example.location
  account_tier             = "Standard"
  account_replication_type = "GRS"

  tags = {
    environment = "staging"
  }
}
First we declare what we want to create with the "resource type," and immediately after that we enter a name to refer to this object.
Terraform Structure
This is the folder structure for the Terraform code:
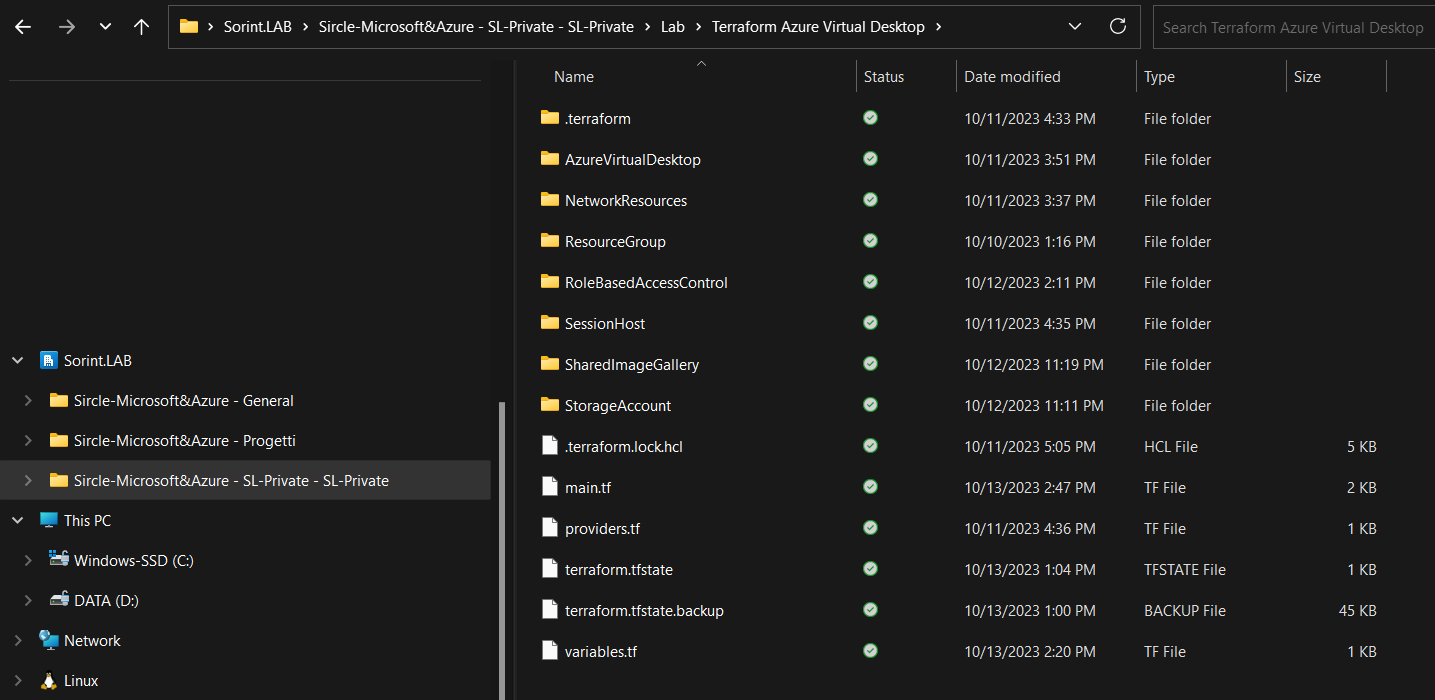
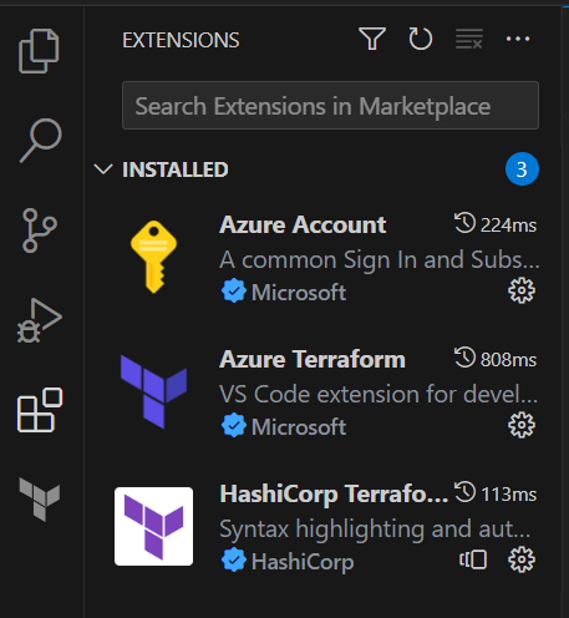
An editor such as Visual Studio Code with the following extensions installed is recommended for using and managing the code:
- Azure Terraform
- HashiCorp Terraform
Terraform Files
Terraform is provider-based and each of them allows us to perform different operations, in this one we are going to use azurerm and azuread.
In this case, "azurerm" and "azuread" refer to Azure Resource Manager and Azure Active Directory, respectively. "hashicorp/azurerm" and "hashicorp/azuread" use the HashiCorp repositories for the files needed for both elements.
A list with all supported providers can be found at the following link: https://registry.terraform.io/browse/providers
In terraform the files have .tf extension, the following are needed to start writing a configuration:
• provider.tf - contains the terraform block, provider configurations and aliases • main.tf - containing the resource blocks that define the resources to be created in the target platform • - variables.tf - containing the variable declarations used in the resource blocks • output.tf - containing the output to be generated upon completion of the "apply" operation • *.tfvars - containing the default values of the environment-specific variables
It is not necessary that the files have exactly the same names listed above or that they are all used, however, these are general conventions used in projects.
Terraform Modules
Modules are a great way to follow the DRY principle when working with Terraform. Modules encapsulate a set of Terraform configuration files created to serve a specific purpose; we can subdivide and group the infrastructure by the type of components or service they support.
In our case we are going to use various modules, so as to sectionalize the infrastructure deployment process into various stages and make the code easier to interpret as well as to execute.
It was created from Visual Studio Code, which will help us in writing the code:
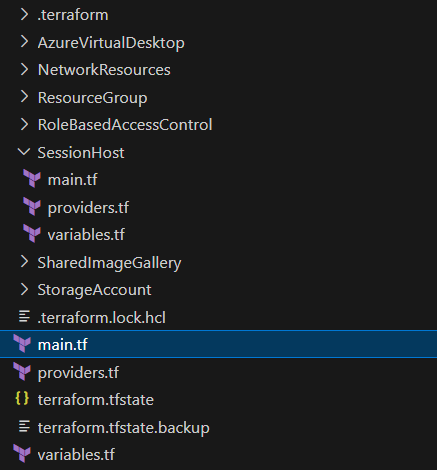
The main project folder contains its set of configuration files, in addition to general resource blocks, module blocks are also declared in these configuration files.
Module blocks refer to the source of these modules, which can be a remote git repository, a Terraform registry, or a locally developed module (folder).
We report an example, the module block below uses a remotely stored module:
module "terraform_test_module" {
 source  = "sorint.com/your-org/terraform_test_module"
 version = "1.0.0"

 argument_1                     = var.test_1
 argument_2                     = var.test_2
 argument_3                     = var.test_3
}
Terraform State
Terraform records information about the resources created in a status file. This lets Terraform itself know which resources are under its control and when to update and destroy them. The state file, by default, is called terraform.tfstate and is located in the same directory where Terraform is run; it is created after running terraform apply.
The actual contents of this file is a mapping in JSON format of the resources defined in the configuration and those existing in the infrastructure. When Terraform is run, it can use this mapping to compare the infrastructure with the code and make any necessary changes.
Tips for Writing Code
The steps necessary for successful code writing are:
- Identification of what needs to be created and related configurations
- Identificazione dei provider Terraform necessari per ottenere l’obbiettivo
- Identification of the Terraform providers needed to achieve the goal
- Enter the providers in the provider.tf file
- Write the code in the main.tf file updating the variables.tf file, after each resource written, with the variables used
- Assign a value to the variables written in variables.tf in the variables.tfvars file
The execution of Terraform is not sequential, consequently it is not necessary to follow a pattern of writing components, it in addition works with 10 parallel streams that guarantee the execution of multiple tasks in parallel.
The code execution sequence is defined with dependencies based on the following scenarios:
- No dependence
- Implicit dependencies
- Explicit dependencies
File providers.tf
The providers.tf file is present in each module and is configured as follows:
terraform {
  required_providers {
    azurerm = {
      source  = "hashicorp/azurerm"
      version = "~>3.74"
    }
    azuread = {
      source = "hashicorp/azuread"
    }
  }
}
provider "azurerm" {
  features {}
}
Resource Group module
Let's start with the module related to the creation of the Resource Group because, in addition to being the simplest one, it is also the one on which we are then going to put all the resources.
In the main.tf file we are going to write the code for the creation of the resource:
# Resource group name is output when execution plan is applied
resource "azurerm_resource_group" "resource-group" {
  name     = var.rg-name
  location = var.resource-location
  tags = var.tags
}
The variables.tf file contains the variables called in the configurations parameters:
variable "rg-name" {
  type = string
}
variable "resource-location" {
  type = string
}
variable "tags" {
  type = map(string)
}
Since the Resource Group name is called in various modules it will also be necessary in other main.tf files. Output.tf contains the output definitions for our module, used to pass information about the parts of the infrastructure defined by this module to other parts of the configuration:
output "rg-name" {
  value = azurerm_resource_group.resource-group.name
}
Going back to the variables file, we preferred to indicate the "resource-location" and "tags" in the main variables.tf file in the root because both the tags and the region where we are going to distribute the resources will always be the same. Through the main.tf where we will then go to call the modules we will pass the desired values.
Network Resources Module
This module will contain all the necessary basic network resources such as:
- Virtual Network
- Subnet
- Network Security Group
Peering could also be configured in this main.tf in case the project involves connecting the spoke vNet with the main Hub.
# Create virtual network for spoke
resource "azurerm_virtual_network" "vnet" {
  name                = var.vnet-name
  location            = var.resource-location
  resource_group_name = var.rg-name
  address_space       = ["10.10.0.0/16"]
}

# Create subnet for avd
resource "azurerm_subnet" "snet" {
  name                 = var.snet-name
  resource_group_name  = var.rg-name
  virtual_network_name = azurerm_virtual_network.vnet.name
  address_prefixes     = ["10.10.0.0/24"]
}

# Create Network Security Group
resource "azurerm_network_security_group" "nsg" {
  name                = var.ngs-name
  location            = var.resource-location
  resource_group_name = var.rg-name
  security_rule {
    name                       = "allow-rdp"
    priority                   = 100
    direction                  = "Inbound"
    access                     = "Allow"
    protocol                   = "Tcp"
    source_port_range          = "*"
    destination_port_range     = 3389
    source_address_prefix      = "*"
    destination_address_prefix = "*"
  }
}

# Associate Network Security Group to Subnet
resource "azurerm_subnet_network_security_group_association" "nsg-association" {
  subnet_id                 = azurerm_subnet.snet.id
  network_security_group_id = azurerm_network_security_group.nsg.id
}
The variables.tf files in this case is as follows:
variable "rg-name" {
  type = string
}

variable "resource-location" {
  type = string
}

variable "vnet-name" {
  type = string
}

variable "snet-name" {
  type = string
}

variable "ngs-name" {
  type = string
}
In the output we are going to report the subnet ID because it will be needed when we go to do the network card creation of the virtual machines.
output "avd-snet" {
  value = azurerm_subnet.snet.id
}
Azure Virtual Desktop module
This module is very important because it will contain everything that is the Azure Virtual Desktop management back-plane, so: Workspace, Host Pool and Application Group.
# Create AVD workspace
resource "azurerm_virtual_desktop_workspace" "avd-workspace" {
  name                = var.avd-workspace-name
  resource_group_name = var.rg-name
  location            = var.resource-location
  friendly_name       = "${var.avd-vm-prefix} Workspace"
  description         = "${var.avd-vm-prefix} Workspace"
}

# Create AVD host pool
resource "azurerm_virtual_desktop_host_pool" "avd-hostpool" {
  resource_group_name      = var.rg-name
  location                 = var.resource-location
  name                     = var.avd-hostpool-name
  friendly_name            = var.avd-hostpool-name
  validate_environment     = var.avd-hostpool-validate-env
  start_vm_on_connect      = var.avd-hostpool-start-vm
  # custom_rdp_properties  = "targetisaadjoined:i:1;drivestoredirect:s:*;audiomode:i:0;videoplaybackmode:i:1;redirectclipboard:i:1;redirectprinters:i:1;devicestoredirect:s:*;redirectcomports:i:1;redirectsmartcards:i:1;usbdevicestoredirect:s:*;enablecredsspsupport:i:1;redirectwebauthn:i:1;use multimon:i:1;enablerdsaadauth:i:1;"
  description              = "${var.avd-vm-prefix} Terraform HostPool"
  type                     = var.avd-hostpool-type
  maximum_sessions_allowed = 15
  load_balancer_type       = var.avd-hostpool-load-balancer-type
  scheduled_agent_updates {
    enabled = true
    timezone = "Central European Standard Time"
    schedule {
      day_of_week = "Sunday"
      hour_of_day = 4
    }
  }
}

resource "time_rotating" "avd_registration_expiration" {
  # Must be between 1 hour and 30 days
  rotation_days = 29
}

# Create the registration information for the host pool, information includes host pool ID and an expiration date specified in var.rfc3339
resource "azurerm_virtual_desktop_host_pool_registration_info" "registrationinfo" {
  hostpool_id     = azurerm_virtual_desktop_host_pool.avd-hostpool.id
  expiration_date = time_rotating.avd_registration_expiration.rotation_rfc3339
}

# Create AVD Desktop Application Group
resource "azurerm_virtual_desktop_application_group" "avd-dag" {
  resource_group_name = var.rg-name
  host_pool_id        = azurerm_virtual_desktop_host_pool.avd-hostpool.id
  location            = var.resource-location
  type                = "Desktop"
  name                = "${var.avd-vm-prefix}-dag"
  friendly_name       = "Desktop AppGroup"
  description         = "AVD application group"
  depends_on          = [
                          azurerm_virtual_desktop_host_pool.avd-hostpool,
                          azurerm_virtual_desktop_workspace.avd-workspace
                        ]
}

# Associate Workspace and Application Group
resource "azurerm_virtual_desktop_workspace_application_group_association" "ws-dag" {
  application_group_id = azurerm_virtual_desktop_application_group.avd-dag.id
  workspace_id         = azurerm_virtual_desktop_workspace.avd-workspace.id
}
I also report the variables file in this case:
variable "rg-name" {
type        = string
description = "Name of the Resource group in which to deploy service objects"
}

variable "resource-location" {
  type = string
}

variable "avd-workspace-name" {
type        = string
default     = "AVD TF Workspace"
}

variable "avd-hostpool-name" {
type        = string
default     = "AVD-TF-HP"
}

variable "avd-hostpool-validate-env" {
  type = bool
}

variable "avd-hostpool-start-vm" {
  type = bool
}

variable "avd-hostpool-type" {
  type = string
}

variable "avd-hostpool-load-balancer-type" {
  type = string
}

variable "avd-vm-prefix" {
type        = string
description = "Prefix of the name of the AVD machine(s)"
}
In the output we need to bring back some values (mainly related to the Host Pool) needed when we go to create the Session Hosts:
output "avd-host-pool-id" {
  value = azurerm_virtual_desktop_host_pool.avd-hostpool.id
}

output "avd-host-pool-name" {
  value = azurerm_virtual_desktop_host_pool.avd-hostpool.name
}

output "avd-host-pool-reg-token" {
  value = azurerm_virtual_desktop_host_pool_registration_info.registrationinfo.token
}

output "avd-application-group-id" {
  value = azurerm_virtual_desktop_application_group.avd-dag.id
}
After creating the Host Pool that will contain the Azure Virtual Desktop configurations, we can proceed with creating the Session Hosts, which are the machines that will register to the pool and host user sessions.
Session Host module
It is definitely the most "complex" module as it is the one that also contains the most rows.
Initially the network cards for the virtual machines are created, then the machines are created with the addition of the extensions needed for Join with Azure AD and registration with the Azure Virtual Desktop pool.
Use is made of the count to go to create a number of machines chosen through the enhancement of a variable.
# Create NIC for sessions hosts
resource "azurerm_network_interface" "avd-nic" {
  count               = var.avd-host-pool-size
  # name                = "${var.avd-vm-prefix}-${count.index + 1}-nic"
  name                = "${var.avd-vm-prefix}-${format("%02d",count.index+1)}-nic"
  resource_group_name = var.rg-name
  location            = var.resource-location

  ip_configuration {
    name                          = "nic${count.index + 1}_config"
    subnet_id                     = var.avd-snet
    private_ip_address_allocation = "Dynamic"
  }
}

# Function to generate random passowrd to use for local admin account
resource "random_password" "avd-local-admin" {
  length           = 16
  special          = true
  min_special      = 2
  override_special = "*!@#?"
}

# Save the result of the function in a local variable
locals {
  avd-local-admin-password = random_password.avd-local-admin.result
}

# Print the output as a string at the end of the terraform cycle
output "avd-local-admin-password" {
  value = "${local.avd-local-admin-password}"
}

# Virtual Machine creation
resource "azurerm_windows_virtual_machine" "avd-vm" {
  count                 = var.avd-host-pool-size
  name                  = "${var.avd-vm-prefix}-${count.index + 1}"
  resource_group_name   = var.rg-name
  location              = var.resource-location
  size                  = "Standard_D4s_v4"
  license_type          = "Windows_Client"
  network_interface_ids = ["${azurerm_network_interface.avd-nic.*.id[count.index]}"]
  provision_vm_agent    = true
  admin_username        = "avd-local-admin"
  admin_password        = local.avd-local-admin-password

  additional_capabilities {
  }
  identity {
    type = "SystemAssigned"
  }

  os_disk {
    name                 = "${lower(var.avd-vm-prefix)}-${count.index + 1}"
    caching              = "ReadWrite"
    storage_account_type = "Standard_LRS"
  }

  source_image_reference {
    publisher = "MicrosoftWindowsDesktop"
    offer     = "Windows-10"
    sku       = "20h2-evd"
    version   = "latest"
  }
}

# Add VM extension for Azure AD join
resource "azurerm_virtual_machine_extension" "avd-azuread-join" {
  count                      = var.avd-host-pool-size
  name                       = "AADLoginForWindows"
  virtual_machine_id         = azurerm_windows_virtual_machine.avd-vm[count.index].id
  publisher                  = "Microsoft.Azure.ActiveDirectory"
  type                       = "AADLoginForWindows"
  type_handler_version       = "2.0"
  auto_upgrade_minor_version = true

  depends_on = [
    azurerm_windows_virtual_machine.avd-vm
  ]
}

# Register the session host to Azure Virtual Desktop
resource "azurerm_virtual_machine_extension" "avd_register_session_host" {
  count                = var.avd-host-pool-size
  name                 = "register-session-host-to-avd"
  virtual_machine_id   = azurerm_windows_virtual_machine.avd-vm[count.index].id
  publisher            = "Microsoft.Powershell"
  type                 = "DSC"
  type_handler_version = "2.73"

  settings = <<-SETTINGS
    {
      "modulesUrl": "${var.avd_register_session_host_modules_url}",
      "configurationFunction": "Configuration.ps1\\AddSessionHost",
      "properties": {
        "hostPoolName": "${var.avd-host-pool-name}",
        "aadJoin": true,
        "UseAgentDownloadEndpoint": true,
        "aadJoinPreview": false,
        "mdmId": "",
        "sessionHostConfigurationLastUpdateTime": ""
      }
    }
  SETTINGS

  protected_settings = <<-PROTECTED_SETTINGS
    {
      "properties": {
        "registrationInfoToken": "${var.avd-host-pool-reg-token}"
      }
    }
    PROTECTED_SETTINGS

  lifecycle {
    ignore_changes = [settings, protected_settings]
  }

  depends_on = [azurerm_virtual_machine_extension.avd-azuread-join]
}
The variables file in this case is composed as follows:
variable "avd-host-pool-size" {
  type        = number
  description = "Number of session hosts to add to the AVD host pool."
}

variable "avd-host-pool-id" {
  type = string
}

variable "avd-host-pool-name" {
  type = string
}

variable "avd-host-pool-reg-token" {
  type = string
}

variable "resource-location" {
  type = string
}

variable "rg-name" {
  type = string
}

variable "avd-vm-prefix" {
type        = string
description = "Prefix of the name of the AVD machine(s)"
}

variable "avd-snet" {
  type = string
}

variable "avd_register_session_host_modules_url" {
  type        = string
  description = "URL to .zip file containing DSC configuration to register AVD session hosts to AVD host pool"
  default     = "https://wvdportalstorageblob.blob.core.windows.net/galleryartifacts/Configuration_09-08-2022.zip"
}
Recalling the modules
Now that we have the modules ready we can proceed by calling each module within the main.tf file:
module "ResourceGroup" {
  source = "./ResourceGroup"
  rg-name = "rg-lab-terraform-001"
  resource-location = var.resource-location
  tags = var.tags
}

module "NetworkResources" {
  source = "./NetworkResources"
  rg-name = module.ResourceGroup.rg-name
  resource-location = var.resource-location
  vnet-name = "vnet-avd"
  snet-name = "snet-avd"
  ngs-name = "nsg-avd"
}

module "AzureVirtualDesktop" {
  source = "./AzureVirtualDesktop"
  rg-name = module.ResourceGroup.rg-name
  resource-location = var.resource-location
  avd-hostpool-validate-env = false
  avd-vm-prefix = "vmavdterraform"
  avd-hostpool-load-balancer-type = "BreadthFirst" #[BreadthFirst, DepthFirst]
  avd-hostpool-type = "Pooled" #[Pooled, Personal]
  avd-hostpool-start-vm = true
}

module "SessionHost" {
  source = "./SessionHost"
  rg-name = module.ResourceGroup.rg-name
  resource-location = var.resource-location
  avd-host-pool-name = module.AzureVirtualDesktop.avd-host-pool-name
  avd-host-pool-id = module.AzureVirtualDesktop.avd-host-pool-id
  avd-host-pool-size = 2
  avd-host-pool-reg-token = module.AzureVirtualDesktop.avd-host-pool-reg-token
  avd-vm-prefix = "Terraform"
  avd-snet = module.NetworkResources.avd-snet
}
To call a module, simply indicate it in the source, then to pass output values derived from another module, one must write the name of the variable and value it by calling the output: module.modulosource.output
Preparing the Environment
To quickly install Terraform in Windows you can run the following command from an administrative prompt:
choco install terraform
After Terraform is installed and the files are set up, we can begin the actual deployment process.
To launch the code we will need a user who has permissions to perform the operations described in the code.
- Navigate through the session until you get under the root folder of Terraform files
- Launch the az login command and log in with the utility
- Run the terraform init command to allow Terraform to autonomously create the files needed for execution
- Launch the terraform plan command so that Terraform checks for errors in the code
- Run the terraform apply command to execute the code
- Once apply is executed check on portal that the created resources are properly configured and working
During terraform apply you will be prompted to accept or reject the actions that terraform will perform, this will allow you to view a recap of the actions it is about to perform so that you can weigh whether to continue execution or abort it.
The terraform init command will begin downloading the Azure modules needed to manage the Azure resources defined in the .tf files and initialize a working directory containing the Terraform configuration files.
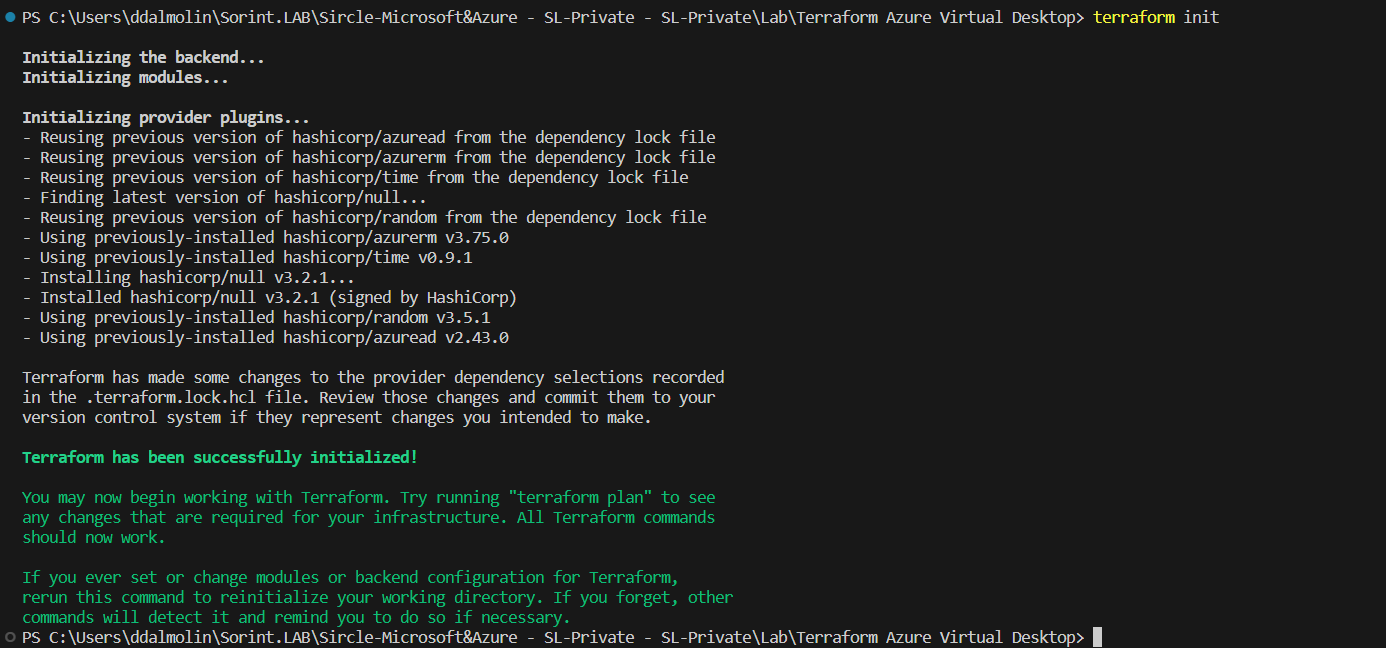
Let us now go to run the terraform plan command. This will evaluate our Terraform configuration to determine the desired state of all declared resources, compare the desired state to the infrastructure objects actually managed within the working directory and current workspace. It creates an execution plan, but does not execute it.
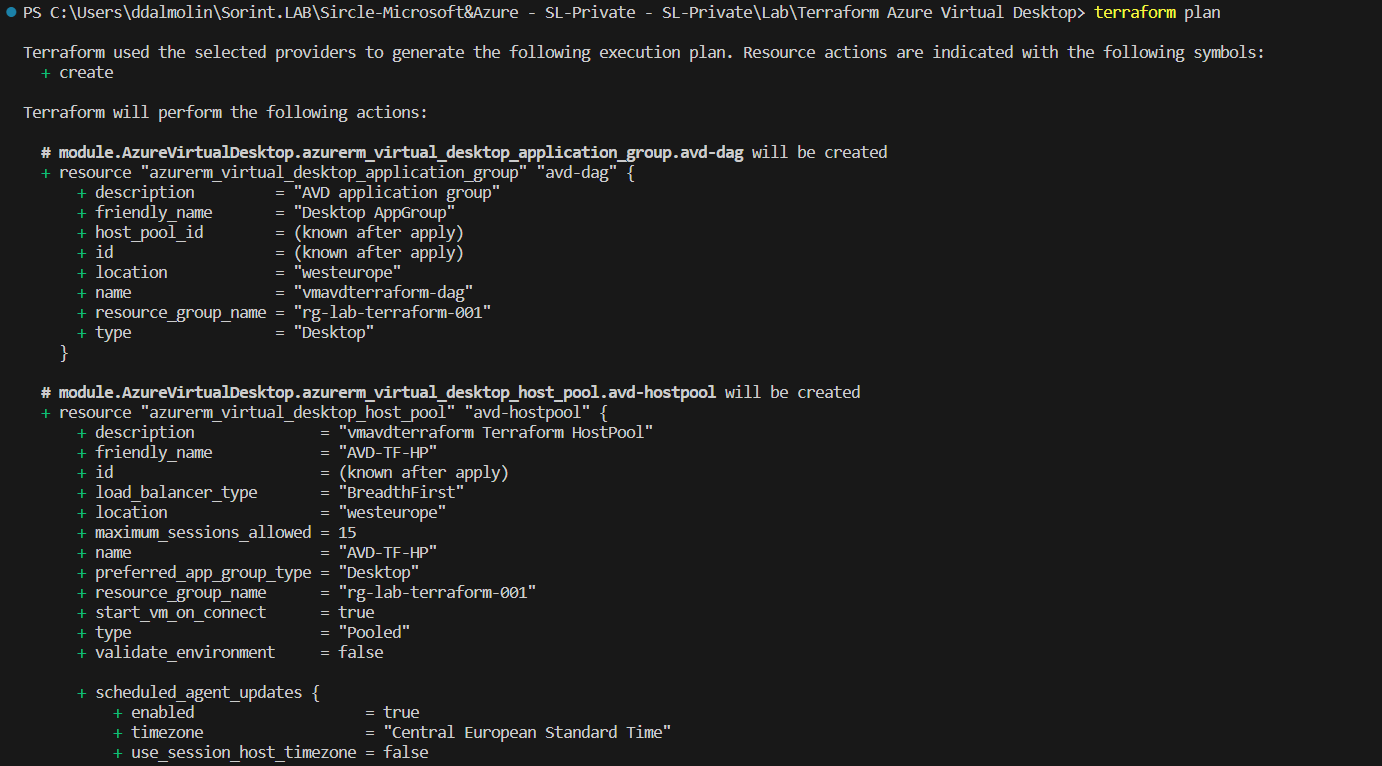
The output of the terraform plan command can be lengthy, but checking it diligently ensures that you do not engage in resource provisioning that you do not intend to do.
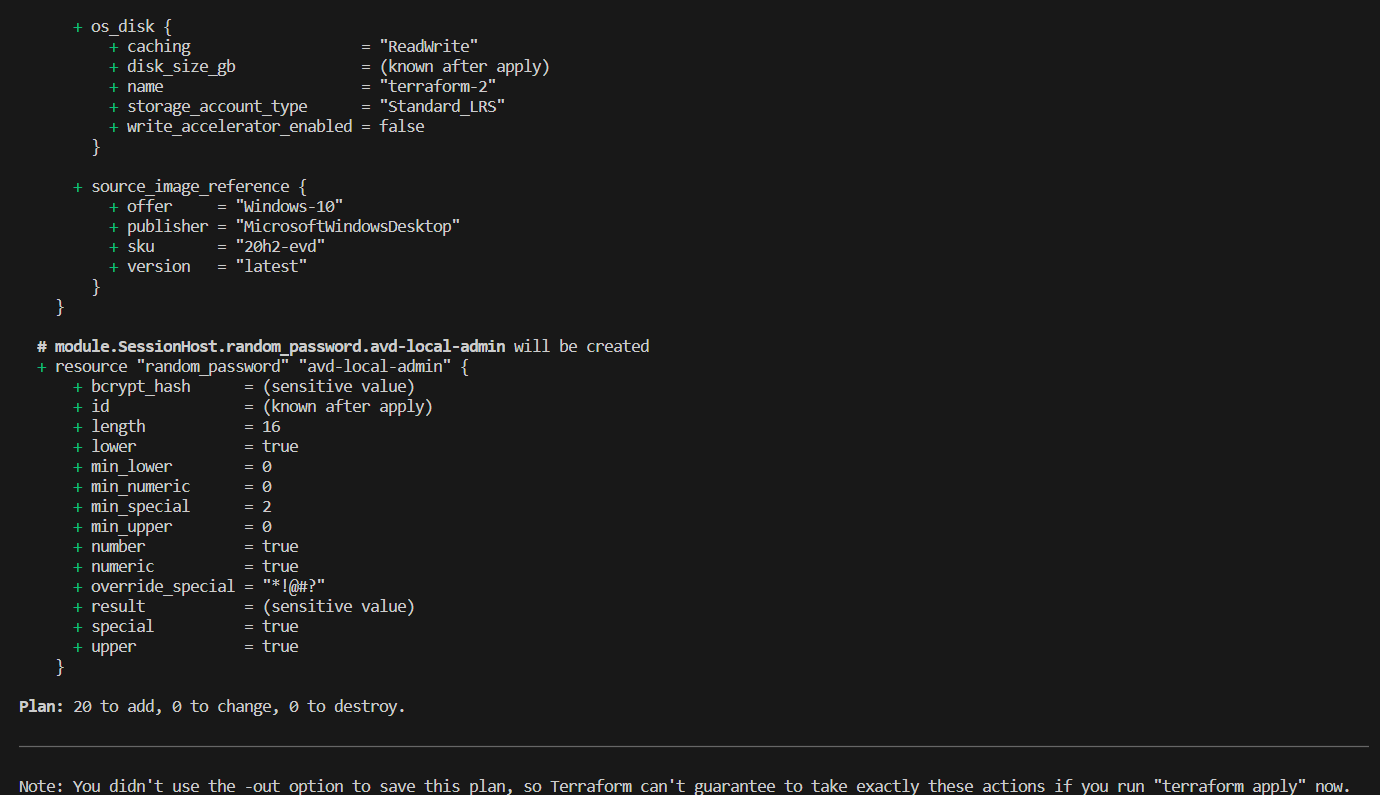
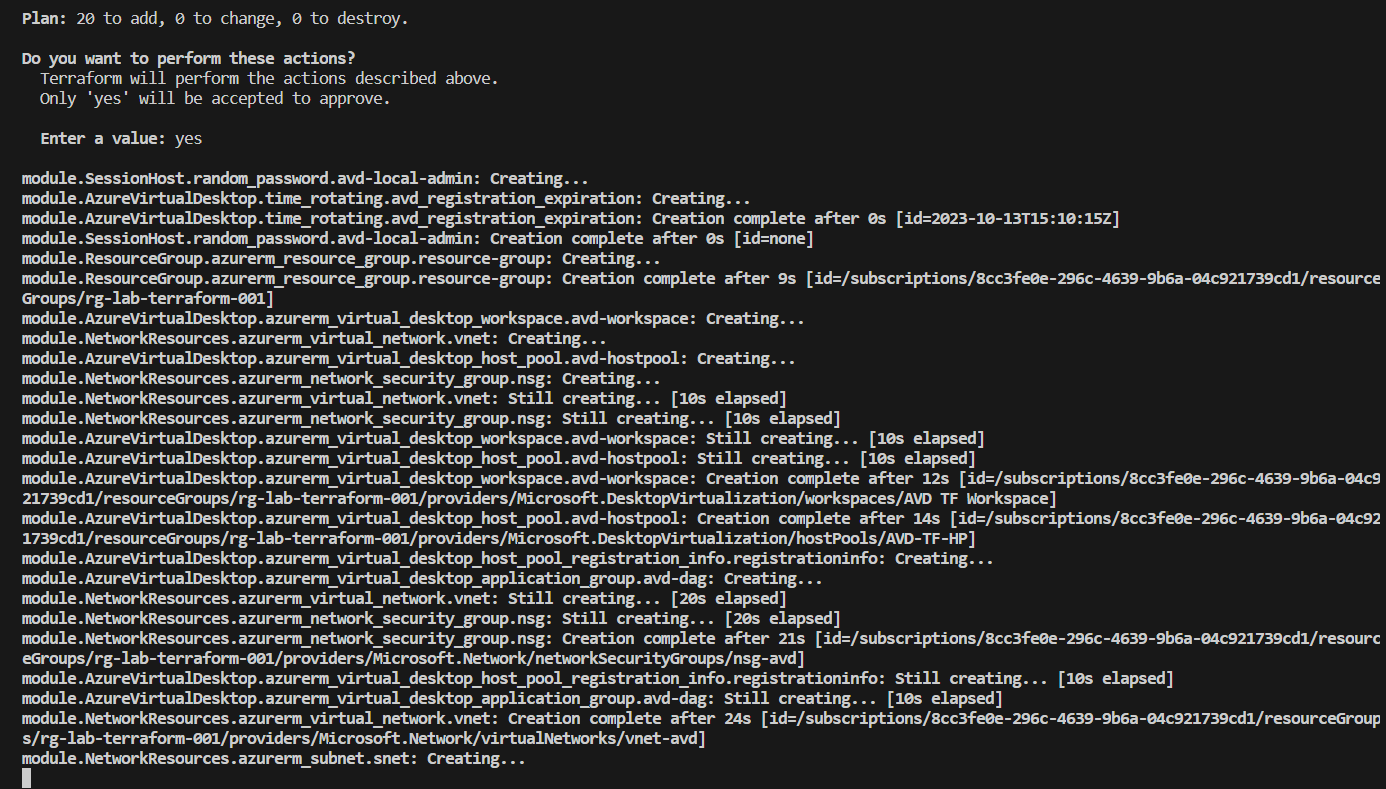
Finally, run terraform apply, this command applies the changes necessary to achieve the desired state of the configuration, that is, the set of actions generated by the execution of terraform plan.
When executed, you will see a review of the plan that Terraform intends to apply one last time and will be prompted to confirm execution by typing "yes."
Environment Validation
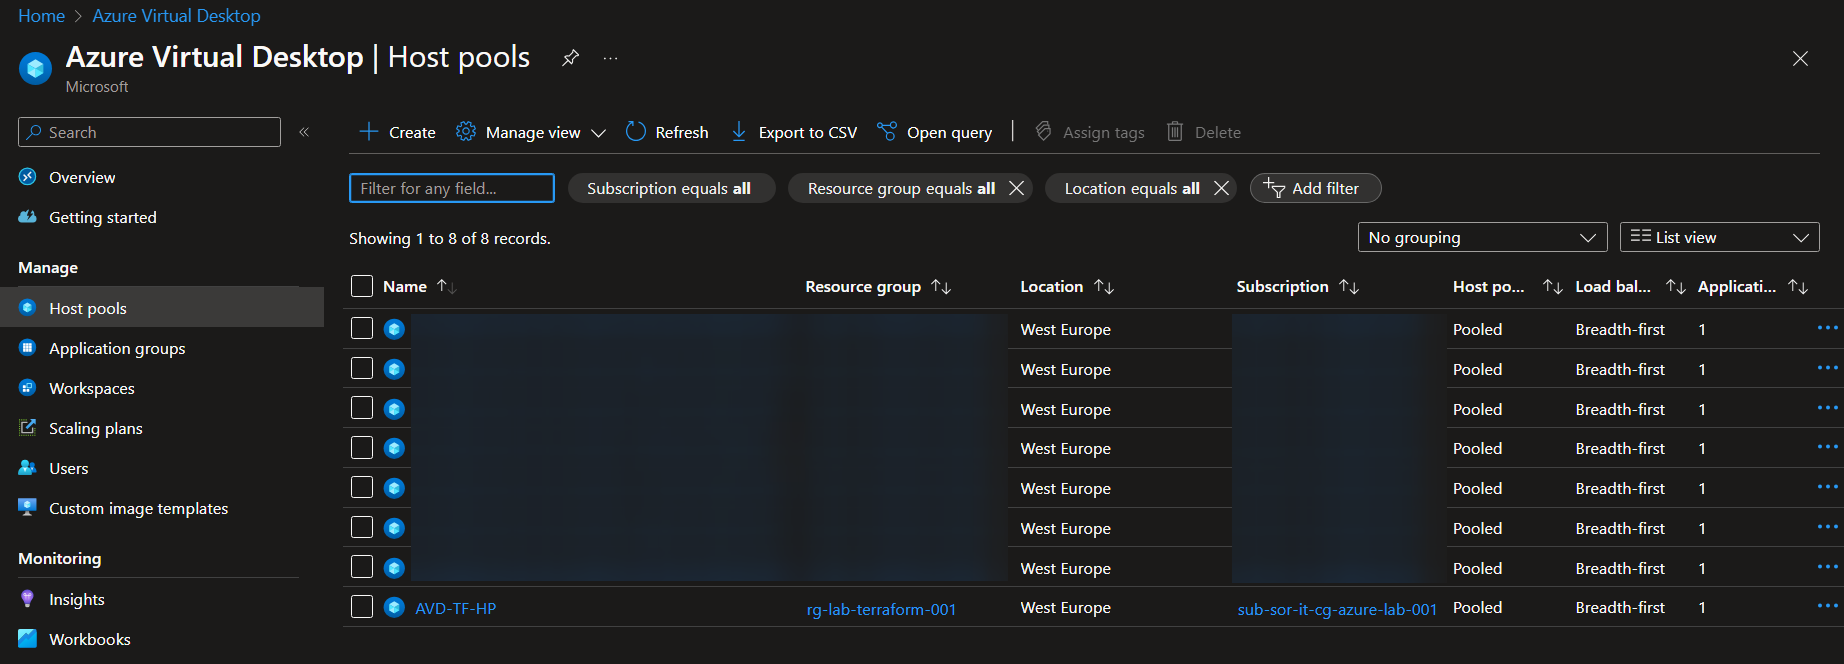
Log on to the Azure portal and select "Azure Virtual Desktop" and verify that the infrastructure is in place.
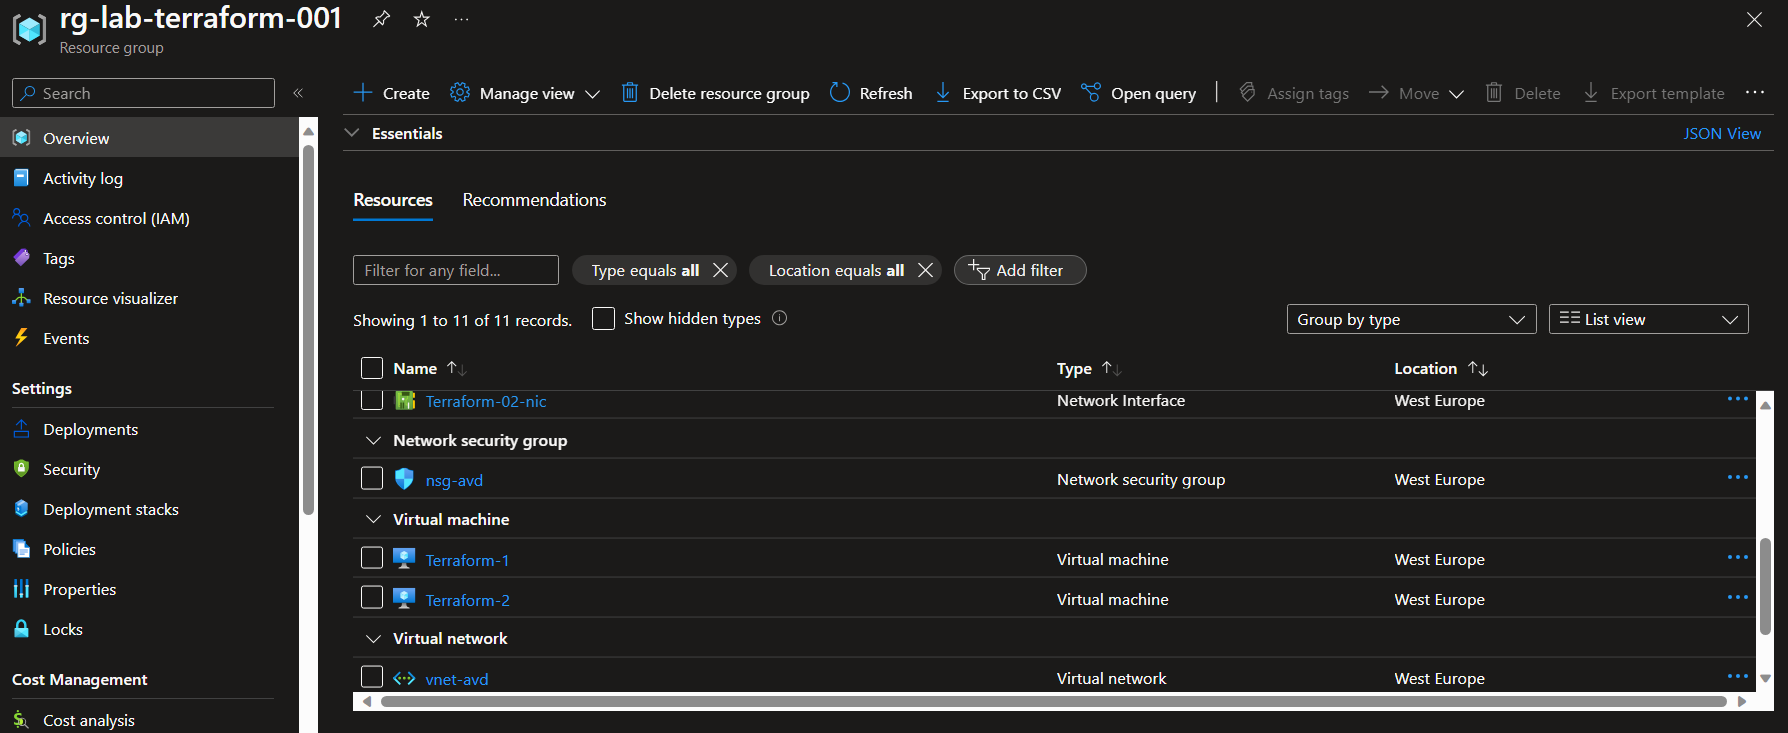
Also check the Resource Group and the individual resources contained within it.
Clean-up the Resources
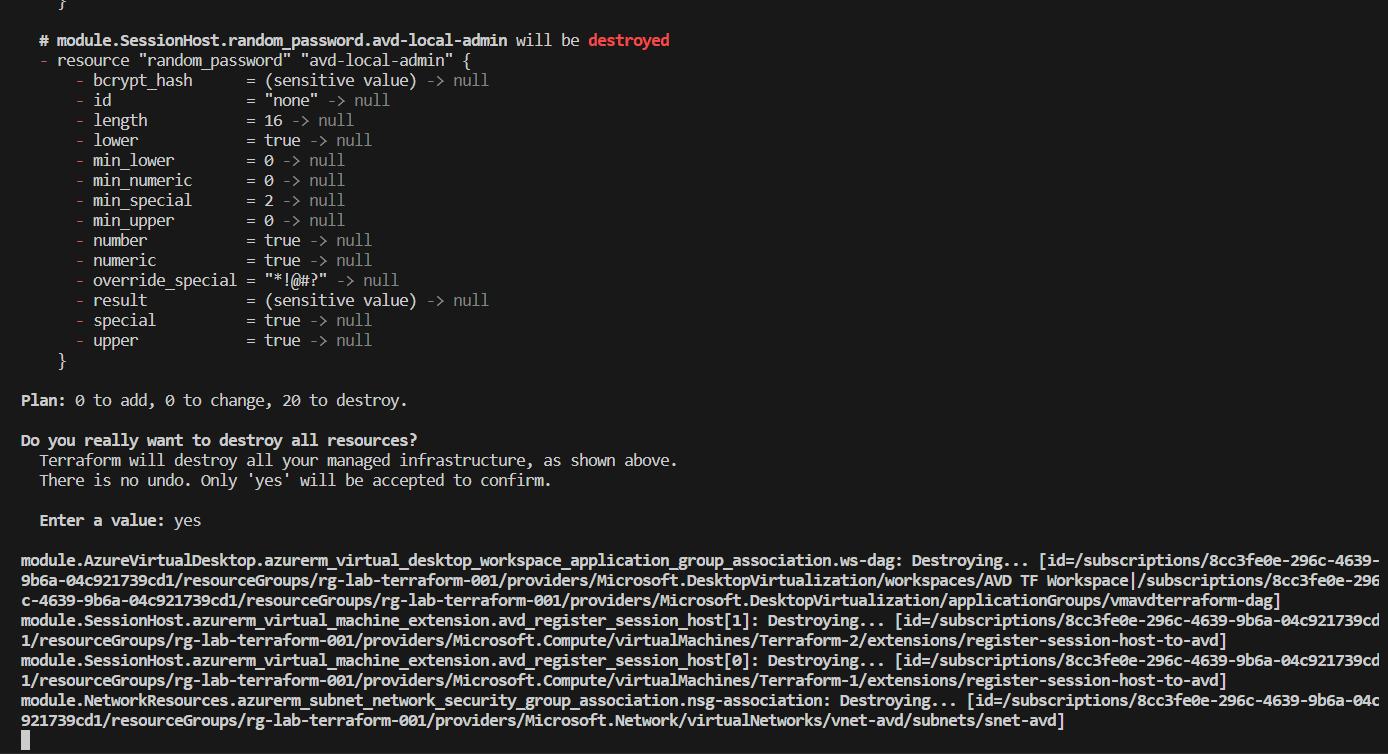
If you want to delete all of the above resources, you can use the terraform destroy command.
References
- https://developer.hashicorp.com/terraform/tutorials/aws-get-started/install-cli
- https://registry.terraform.io/providers/hashicorp/azurerm/latest/docs
- https://learn.microsoft.com/en-us/power-pages/configure/vs-code-extension
- https://learn.microsoft.com/en-us/azure/developer/terraform/configure-azure-virtual-desktop
**Avviso: ** Molti dei nostri clienti hanno stipulato accordi di riservatezza che tutelano i loro marchi da scopi commerciali. Pertanto potresti incontrare diciture come “Nome Cliente Riservato” oppure vedrai riportato il settore del cliente invece del suo nome. Benvenuti in questo articolo del blog, in cui esploreremo l'implementazione di un'infrastruttura Azure Virtual Desktop senza utilizzare la classica console di amministrazione grafica a cui siamo abituati in Azure bensì tramite codice per mezzo di Terraform.
Terraform è uno strumento open-source per la gestione dell'infrastruttura come codice (IaC), il che significa che potremo creare e modificare l'infrastruttura in modo dichiarativo, prevedibile e intuitivo.
L'idea alla base di IaC è quella di codificare l'intero processo di creazione dell'infrastruttura. Terraform ci permette di definire le risorse utilizzando un linguaggio ad alto livello, rendendolo leggibile anche per chi non è un esperto di programmazione. Questo linguaggio è chiamato HCL (HashiCorp Configuration Language).
Nel corso di questo articolo, vi guideremo attraverso le seguenti configurazioni utilizzando Terraform:
- Creazione di un Gruppo di Risorse Azure
- Configurazione di risorse di rete in Azure
- Implementazione dei componenti principali di Azure Virtual Desktop
- Creazione di Session Host di Azure Virtual Desktop (con Azure AD Join)
Per ora, non affronteremo dettagli più avanzati, come l'utilizzo di un service principal con autorizzazioni API per la connessione ad Azure, l'uso di un account di archiviazione per ospitare le condivisioni necessarie per i profili FSLogix, la creazione di macchine virtuali personalizzate da un'immagine tramite Azure Compute Gallery e l'assegnazione di ruoli RBAC Azure AD alle risorse.

Principali usi di Terraform
Terraform viene solitamente utilizzato per:
- Gestione amministrativa delle risorse e dell'infrastruttura
- Deploy infrastrutturale
- Automazione dell'infrastruttura
E' importante sottolineare che Terraform di solito non viene utilizzato come piano di Disaster Recovery (DR) per una seria di considerazioni poco vantaggiose.
Di solito, quando si decide di utilizzare Terraform, la possibilità di creare risorse e oggetti in cloud tramite il portale viene disabilitata. Ciò è dovuto al fatto che Terraform si occupa dell'intero ciclo di vita, partendo dalla fase di provisioning, passando per la configurazione e, infine, arrivando alla fase di decommissioning, rendendo inutile la gestione manuale delle risorse attraverso il portale.
Basi di Terraform
Per distribuire le risorse su Azure è necessario definire il provider nei file terraform.
Per ogni risorsa che si vuole distribuire usando Terraform c'è una sintassi specifica da usare. Nell'esempio seguente si può vedere la sintassi per la creazione di uno account di archiviazione.
resource "azurerm_storage_account" "example" {
  name                     = "storageaccountname"
  resource_group_name      = azurerm_resource_group.example.name
  location                 = azurerm_resource_group.example.location
  account_tier             = "Standard"
  account_replication_type = "GRS"

  tags = {
    environment = "staging"
  }
}
Prima dichiariamo cosa vogliamo creare con il "resource type" e subito dopo si inserisce un nome per fare riferimento a questo oggetto.
Struttura di Terraform
Questa è la struttura di cartelle per il codice Terraform:

Per l'utilizzo e la gestione del codice si consiglia un editor come Visual Studio Code con le seguenti estensioni installate:
- Azure Terraform
- HashiCorp Terraform

Files di Terraform
Terraform é basato su provider e ognuno di essi ci consente di effettuare diverse operazioni, in questo andremo ad utilizzare azurerm e azuread.
In questo caso, "azurerm" e "azuread" si riferiscono rispettivamente a Azure Resource Manager e Azure Active Directory. "hashicorp/azurerm" e "hashicorp/azuread" utilizzano i repository di HashiCorp per i file necessari per entrambi gli elementi.
Al seguente link è possibile trovare una lista con tutti i providers supportati: https://registry.terraform.io/browse/providers
In terraform i file hanno estensione .tf, per iniziare a scrivere una configurazione sono necessari i seguenti:
- provider.tf - contiene il blocco terraform, le configurazioni del provider e gli alias
- main.tf - contenente i blocchi delle risorse che definiscono le risorse da creare nella piattaforma di destinazione
- variables.tf - contenente le dichiarazioni delle variabili utilizzate nei blocchi di risorse
- output.tf - contenente l'output che deve essere generato al completamento dell'operazione "apply"
- *.tfvars - contenente i valori predefiniti delle variabili specifiche dell'ambiente
Non è necessario che i file abbiano esattamente gli stessi nomi elencati sopra o che vengano utilizzati tutti, tuttavia si tratta di convenzioni generali utilizzate nei progetti.
Moduli in Terraform
I moduli sono un ottimo modo per seguire il principio DRY quando si lavora con Terraform. I moduli incapsulano un insieme di file di configurazione di Terraform creati per servire uno scopo specifico, possiamo suddividere e raggruppare l'infrastruttura in base al tipo di componenti o al servizio che supportano.
Nel nostro caso andremo a usare vari moduli, così da settorializzare il processo di distribuzione dell'infrastruttura in varie fasi e rendere il codice più semplice da interpretare oltre che da eseguire.
E' stata creata partendo da Visual Studio Code che ci aiuterà nella scrittura del codice:

La cartella principale del progetto contiene il suo insieme di file di configurazione, oltre ai blocchi di risorse generali, in questi file di configurazione vengono dichiarati anche i blocchi dei moduli.
I blocchi di moduli fanno riferimento alla fonte di questi moduli, che può essere un repository git remoto, un registro Terraform o un modulo sviluppato localmente (cartella).
Riportiamo un esempio, il blocco modulo qui sotto utilizza un modulo memorizzato remotamente:
module "terraform_test_module" {
 source  = "sorint.com/your-org/terraform_test_module"
 version = "1.0.0"

 argument_1                     = var.test_1
 argument_2                     = var.test_2
 argument_3                     = var.test_3
}
Terraform state
Terraform registra le informazioni sulle risorse create in un file di stato. Ciò consente a Terraform stesso di sapere quali risorse sono sotto il suo controllo e quando aggiornarle e distruggerle. Il file di stato, per impostazione predefinita, si chiama terraform.tfstate e si trova nella stessa directory in cui viene eseguito Terraform, viene creato dopo aver eseguito terraform apply.
Il contenuto effettivo di questo file è una mappatura in formato JSON delle risorse definite nella configurazione e di quelle esistenti nell'infrastruttura. Quando Terraform viene eseguito, può utilizzare questa mappatura per confrontare l'infrastruttura con il codice e apportare le modifiche necessarie.
Suggerimenti per la scrittura del codice
Gli step necessari per la buona riuscita del codice sono:
- Identificazione di ció che va creato e relative configurazioni
- Identificazione dei provider Terraform necessari per ottenere l’obbiettivo
- Inserire i provider nel file provider.tf
- Scrivere il codice nel file main.tf aggiornando il file variables.tf, dopo ogni risorsa scritta, con le variabili utilizzate
- Assegnare un valore alle variabili scritte in variables.tf nel file variables.tfvars
L’esecuzione di Terraform non é sequenziale, di conseguenza non é necessario seguire un pattern di scrittura dei componenti, essa in oltre lavora con 10 stream paralleli che garantiscono l’esecuzione di piú attivitá in parallelo.
La sequenza di esecuzione del codice viene definita con delle dipendenze in base ai seguenti scenari:
- Nessuna dipendenza
- Dipendenze implicite
- Dipendenze esplicite
File providers.tf
Il file providers.tf è presente in ogni modulo ed è così configurato:
terraform {
  required_providers {
    azurerm = {
      source  = "hashicorp/azurerm"
      version = "~>3.74"
    }
    azuread = {
      source = "hashicorp/azuread"
    }
  }
}
provider "azurerm" {
  features {}
}
Resource Group module
Partiamo dal modulo relativo alla creazione del Resource Group perchè, oltre a essere quello più semplice, è anche quello su cui poi andremo a inserire tutte le risorse.
Nel file main.tf andiamo a scrivere il codice per la creazione della risorsa:
# Resource group name is output when execution plan is applied
resource "azurerm_resource_group" "resource-group" {
  name     = var.rg-name
  location = var.resource-location
  tags = var.tags
}
Il file variables.tf contiene le variabili richiamati nei parametri di configurazioni:
variable "rg-name" {
  type = string
}
variable "resource-location" {
  type = string
}
variable "tags" {
  type = map(string)
}
Essendo il nome del Resource Group richiamato in vari moduli si renderà necessario anche in altri file main.tf. Output.tf contiene le definizioni di output per il nostro modulo, utilizzate per passare informazioni sulle parti dell'infrastruttura definite da questo modulo ad altre parti della configurazione:
output "rg-name" {
  value = azurerm_resource_group.resource-group.name
}
Tornando al file delle varibili, abbiamo preferito indicare la "resource-location" e i "tags" nel file variables.tf principale in radice perchè sia i tag che la region in cui andremo a distribuire le risorse saranno sempre gli stessi. Tramite il main.tf principale dove poi andremo a richiamare i moduli passeremo i valori desiderati.
Network resources module
Questo modulo andrà a contenere tutte le risorse network di base necessarie come:
- Virtual Network
- Subnet
- Network Security Group
In questo main.tf si potrebbero anche configurare i peering nel caso in cui il progetto preveda il collegamento della vNet di spoke con l'Hub principale.
# Create virtual network for spoke
resource "azurerm_virtual_network" "vnet" {
  name                = var.vnet-name
  location            = var.resource-location
  resource_group_name = var.rg-name
  address_space       = ["10.10.0.0/16"]
}

# Create subnet for avd
resource "azurerm_subnet" "snet" {
  name                 = var.snet-name
  resource_group_name  = var.rg-name
  virtual_network_name = azurerm_virtual_network.vnet.name
  address_prefixes     = ["10.10.0.0/24"]
}

# Create Network Security Group
resource "azurerm_network_security_group" "nsg" {
  name                = var.ngs-name
  location            = var.resource-location
  resource_group_name = var.rg-name
  security_rule {
    name                       = "allow-rdp"
    priority                   = 100
    direction                  = "Inbound"
    access                     = "Allow"
    protocol                   = "Tcp"
    source_port_range          = "*"
    destination_port_range     = 3389
    source_address_prefix      = "*"
    destination_address_prefix = "*"
  }
}

# Associate Network Security Group to Subnet
resource "azurerm_subnet_network_security_group_association" "nsg-association" {
  subnet_id                 = azurerm_subnet.snet.id
  network_security_group_id = azurerm_network_security_group.nsg.id
}
I file variables.tf in questo caso è il seguente:
variable "rg-name" {
  type = string
}

variable "resource-location" {
  type = string
}

variable "vnet-name" {
  type = string
}

variable "snet-name" {
  type = string
}

variable "ngs-name" {
  type = string
}
In output andiamo a riportare la l'ID della subnet perchè sarà necessario quando si andrà a fare la creazione delle schede di rete delle macchine virtuali.
output "avd-snet" {
  value = azurerm_subnet.snet.id
}
Azure Virtual Desktop module
Questo modulo è molto importante perchè andrà a contenere tutto quello che è il back-plane di gestione di Azure Virtual Desktop, quindi: Workspace, Host Pool e Application Group.
# Create AVD workspace
resource "azurerm_virtual_desktop_workspace" "avd-workspace" {
  name                = var.avd-workspace-name
  resource_group_name = var.rg-name
  location            = var.resource-location
  friendly_name       = "${var.avd-vm-prefix} Workspace"
  description         = "${var.avd-vm-prefix} Workspace"
}

# Create AVD host pool
resource "azurerm_virtual_desktop_host_pool" "avd-hostpool" {
  resource_group_name      = var.rg-name
  location                 = var.resource-location
  name                     = var.avd-hostpool-name
  friendly_name            = var.avd-hostpool-name
  validate_environment     = var.avd-hostpool-validate-env
  start_vm_on_connect      = var.avd-hostpool-start-vm
  # custom_rdp_properties  = "targetisaadjoined:i:1;drivestoredirect:s:*;audiomode:i:0;videoplaybackmode:i:1;redirectclipboard:i:1;redirectprinters:i:1;devicestoredirect:s:*;redirectcomports:i:1;redirectsmartcards:i:1;usbdevicestoredirect:s:*;enablecredsspsupport:i:1;redirectwebauthn:i:1;use multimon:i:1;enablerdsaadauth:i:1;"
  description              = "${var.avd-vm-prefix} Terraform HostPool"
  type                     = var.avd-hostpool-type
  maximum_sessions_allowed = 15
  load_balancer_type       = var.avd-hostpool-load-balancer-type
  scheduled_agent_updates {
    enabled = true
    timezone = "Central European Standard Time"
    schedule {
      day_of_week = "Sunday"
      hour_of_day = 4
    }
  }
}

resource "time_rotating" "avd_registration_expiration" {
  # Must be between 1 hour and 30 days
  rotation_days = 29
}

# Create the registration information for the host pool, information includes host pool ID and an expiration date specified in var.rfc3339
resource "azurerm_virtual_desktop_host_pool_registration_info" "registrationinfo" {
  hostpool_id     = azurerm_virtual_desktop_host_pool.avd-hostpool.id
  expiration_date = time_rotating.avd_registration_expiration.rotation_rfc3339
}

# Create AVD Desktop Application Group
resource "azurerm_virtual_desktop_application_group" "avd-dag" {
  resource_group_name = var.rg-name
  host_pool_id        = azurerm_virtual_desktop_host_pool.avd-hostpool.id
  location            = var.resource-location
  type                = "Desktop"
  name                = "${var.avd-vm-prefix}-dag"
  friendly_name       = "Desktop AppGroup"
  description         = "AVD application group"
  depends_on          = [
                          azurerm_virtual_desktop_host_pool.avd-hostpool,
                          azurerm_virtual_desktop_workspace.avd-workspace
                        ]
}

# Associate Workspace and Application Group
resource "azurerm_virtual_desktop_workspace_application_group_association" "ws-dag" {
  application_group_id = azurerm_virtual_desktop_application_group.avd-dag.id
  workspace_id         = azurerm_virtual_desktop_workspace.avd-workspace.id
}
Riporto anche in questo caso il file delle variabili:
variable "rg-name" {
type        = string
description = "Name of the Resource group in which to deploy service objects"
}

variable "resource-location" {
  type = string
}

variable "avd-workspace-name" {
type        = string
default     = "AVD TF Workspace"
}

variable "avd-hostpool-name" {
type        = string
default     = "AVD-TF-HP"
}

variable "avd-hostpool-validate-env" {
  type = bool
}

variable "avd-hostpool-start-vm" {
  type = bool
}

variable "avd-hostpool-type" {
  type = string
}

variable "avd-hostpool-load-balancer-type" {
  type = string
}

variable "avd-vm-prefix" {
type        = string
description = "Prefix of the name of the AVD machine(s)"
}
In output dobbiamo riportarci un pò di valori (principalmente relativi all'Host Pool) necessari quando andremo a creare i Session Hosts:
output "avd-host-pool-id" {
  value = azurerm_virtual_desktop_host_pool.avd-hostpool.id
}

output "avd-host-pool-name" {
  value = azurerm_virtual_desktop_host_pool.avd-hostpool.name
}

output "avd-host-pool-reg-token" {
  value = azurerm_virtual_desktop_host_pool_registration_info.registrationinfo.token
}

output "avd-application-group-id" {
  value = azurerm_virtual_desktop_application_group.avd-dag.id
}
Dopo aver creato l'Host Pool che conterrà le configurazioni di Azure Virtual Desktop possiamo procedere con la creazione dei Session Hosts, ovvero le macchine che si andranno a registrare al pool e ospiteranno le sessioni degli utenti.
Session Host module
E' sicuramente il modulo più "complesso" in quanto è quello che contiene anche più righe.
Inizialmente vengono create le schede di rete per le macchine virtuali, successivamente vengono create le macchine con l'aggiunta delle estensioni necessarie per il Join con Azure AD e la registrazione con il pool di Azure Virtual Desktop.
Viene fatto uso del count per andare a creare un numero di macchine scelto tramite la valorizzazione di una variabile.
# Create NIC for sessions hosts
resource "azurerm_network_interface" "avd-nic" {
  count               = var.avd-host-pool-size
  # name                = "${var.avd-vm-prefix}-${count.index + 1}-nic"
  name                = "${var.avd-vm-prefix}-${format("%02d",count.index+1)}-nic"
  resource_group_name = var.rg-name
  location            = var.resource-location

  ip_configuration {
    name                          = "nic${count.index + 1}_config"
    subnet_id                     = var.avd-snet
    private_ip_address_allocation = "Dynamic"
  }
}

# Function to generate random passowrd to use for local admin account
resource "random_password" "avd-local-admin" {
  length           = 16
  special          = true
  min_special      = 2
  override_special = "*!@#?"
}

# Save the result of the function in a local variable
locals {
  avd-local-admin-password = random_password.avd-local-admin.result
}

# Print the output as a string at the end of the terraform cycle
output "avd-local-admin-password" {
  value = "${local.avd-local-admin-password}"
}

# Virtual Machine creation
resource "azurerm_windows_virtual_machine" "avd-vm" {
  count                 = var.avd-host-pool-size
  name                  = "${var.avd-vm-prefix}-${count.index + 1}"
  resource_group_name   = var.rg-name
  location              = var.resource-location
  size                  = "Standard_D4s_v4"
  license_type          = "Windows_Client"
  network_interface_ids = ["${azurerm_network_interface.avd-nic.*.id[count.index]}"]
  provision_vm_agent    = true
  admin_username        = "avd-local-admin"
  admin_password        = local.avd-local-admin-password

  additional_capabilities {
  }
  identity {
    type = "SystemAssigned"
  }

  os_disk {
    name                 = "${lower(var.avd-vm-prefix)}-${count.index + 1}"
    caching              = "ReadWrite"
    storage_account_type = "Standard_LRS"
  }

  source_image_reference {
    publisher = "MicrosoftWindowsDesktop"
    offer     = "Windows-10"
    sku       = "20h2-evd"
    version   = "latest"
  }
}

# Add VM extension for Azure AD join
resource "azurerm_virtual_machine_extension" "avd-azuread-join" {
  count                      = var.avd-host-pool-size
  name                       = "AADLoginForWindows"
  virtual_machine_id         = azurerm_windows_virtual_machine.avd-vm[count.index].id
  publisher                  = "Microsoft.Azure.ActiveDirectory"
  type                       = "AADLoginForWindows"
  type_handler_version       = "2.0"
  auto_upgrade_minor_version = true

  depends_on = [
    azurerm_windows_virtual_machine.avd-vm
  ]
}

# Register the session host to Azure Virtual Desktop
resource "azurerm_virtual_machine_extension" "avd_register_session_host" {
  count                = var.avd-host-pool-size
  name                 = "register-session-host-to-avd"
  virtual_machine_id   = azurerm_windows_virtual_machine.avd-vm[count.index].id
  publisher            = "Microsoft.Powershell"
  type                 = "DSC"
  type_handler_version = "2.73"

  settings = <<-SETTINGS
    {
      "modulesUrl": "${var.avd_register_session_host_modules_url}",
      "configurationFunction": "Configuration.ps1\\AddSessionHost",
      "properties": {
        "hostPoolName": "${var.avd-host-pool-name}",
        "aadJoin": true,
        "UseAgentDownloadEndpoint": true,
        "aadJoinPreview": false,
        "mdmId": "",
        "sessionHostConfigurationLastUpdateTime": ""
      }
    }
  SETTINGS

  protected_settings = <<-PROTECTED_SETTINGS
    {
      "properties": {
        "registrationInfoToken": "${var.avd-host-pool-reg-token}"
      }
    }
    PROTECTED_SETTINGS

  lifecycle {
    ignore_changes = [settings, protected_settings]
  }

  depends_on = [azurerm_virtual_machine_extension.avd-azuread-join]
}
Il file variables in questo caso è così composto:
variable "avd-host-pool-size" {
  type        = number
  description = "Number of session hosts to add to the AVD host pool."
}

variable "avd-host-pool-id" {
  type = string
}

variable "avd-host-pool-name" {
  type = string
}

variable "avd-host-pool-reg-token" {
  type = string
}

variable "resource-location" {
  type = string
}

variable "rg-name" {
  type = string
}

variable "avd-vm-prefix" {
type        = string
description = "Prefix of the name of the AVD machine(s)"
}

variable "avd-snet" {
  type = string
}

variable "avd_register_session_host_modules_url" {
  type        = string
  description = "URL to .zip file containing DSC configuration to register AVD session hosts to AVD host pool"
  default     = "https://wvdportalstorageblob.blob.core.windows.net/galleryartifacts/Configuration_09-08-2022.zip"
}
Richiamare i moduli
Ora che abbiamo i moduli pronti possiamo procedere richiamando ogni modulo all'interno del file main.tf principale:
module "ResourceGroup" {
  source = "./ResourceGroup"
  rg-name = "rg-lab-terraform-001"
  resource-location = var.resource-location
  tags = var.tags
}

module "NetworkResources" {
  source = "./NetworkResources"
  rg-name = module.ResourceGroup.rg-name
  resource-location = var.resource-location
  vnet-name = "vnet-avd"
  snet-name = "snet-avd"
  ngs-name = "nsg-avd"
}

module "AzureVirtualDesktop" {
  source = "./AzureVirtualDesktop"
  rg-name = module.ResourceGroup.rg-name
  resource-location = var.resource-location
  avd-hostpool-validate-env = false
  avd-vm-prefix = "vmavdterraform"
  avd-hostpool-load-balancer-type = "BreadthFirst" #[BreadthFirst, DepthFirst]
  avd-hostpool-type = "Pooled" #[Pooled, Personal]
  avd-hostpool-start-vm = true
}

module "SessionHost" {
  source = "./SessionHost"
  rg-name = module.ResourceGroup.rg-name
  resource-location = var.resource-location
  avd-host-pool-name = module.AzureVirtualDesktop.avd-host-pool-name
  avd-host-pool-id = module.AzureVirtualDesktop.avd-host-pool-id
  avd-host-pool-size = 2
  avd-host-pool-reg-token = module.AzureVirtualDesktop.avd-host-pool-reg-token
  avd-vm-prefix = "Terraform"
  avd-snet = module.NetworkResources.avd-snet
}
Per richiamare un modulo è sufficiente indicarlo nel source, successivamente per passare i valori di output derivanti da un altro modulo si deve scrivere il nome della variabile e valorizzarla richiamando l'output: module.modulosorgente.output
Preparazione dell'ambiente
Per installare molto velocemente Terraform in Windows potete lanciare il seguente comando da un prompt amministrativo:
choco install terraform
Dopo aver installato Terraform e predisposto i file possiamo iniziare il processo di distribuzione vero e proprio.
Per lanciare il codice avremo bisogno di un utente che abbia i permessi per effettuare le operazioni descritte nel codice.
- Aprire una sessione terminal
- Navigare nella sessione fino ad arrivare sotto la cartella radice dei file Terraform
- Lanciare il comando az login e loggarsi con l’utenza
- Lanciare il comando terraform init per permettere a Terraform di creare in autonomia i file necessari all’esecuzione
- Lanciare il comando terraform plan in modo che Terraform verifichi che non vi siano errori nel codice
- Lanciare il comando terraform apply per eseguire il codice
- Una volta eseguito l’apply controllare su portale che le risorse create siano correttamente configurate e funzionanti
Durante il terraform apply vi verra richiesto di accettare o rifiutare le azioni che eseguirá terraform, questo vi consentirá di visualizzare un recap delle azioni che sta per eseguire in modo da ponderare se continuare l’esecuzione oppure interromperla.
Il comando terraform init inizierà il download dei moduli Azure necessari per gestire le risorse Azure definite nei file .tf e inizializza una directory di lavoro contenente i file di configurazione di Terraform

Andiamo ora ad eseguire il comando terraform plan. Questo valuterà la nostra configurazione di Terraform per determinare lo stato desiderato di tutte le risorse dichiarate, confronta lo stato desiderato con gli oggetti dell'infrastruttura effettivamente gestiti all'interno della directory di lavoro e dello spazio di lavoro corrente. Crea un piano di esecuzione, ma non lo esegue.

L'output del comando terraform plan può essere lungo, ma controllarlo diligentemente assicura che non ci si impegni a fare il provisioning di risorse che non si intende fare.

Infine, eseguire terraform apply, questo comando applica le modifiche necessarie per raggiungere lo stato desiderato della configurazione, cioè l'insieme di azioni generate dall'esecuzione di terraform plan.
Quando eseguito, si vedrà una revisione del piano che Terraform intende applicare un'ultima volta e verrà richiesto di confermare l'esecuzione digitando "yes".

Validazione dell'ambiente
Accedere al portale Azure e selezionare "Azure Virtual Desktop" e verificare che l'infrastruttura sia presente.

Controllare anche il Resource Group e le singole risorse contenute al suo interno.

Clean-up delle risorse
Se si desidera eliminare tutte le risorse di cui sopra, è possibile utilizzare il comando terraform destroy.

Riferimenti
- https://developer.hashicorp.com/terraform/tutorials/aws-get-started/install-cli
- https://registry.terraform.io/providers/hashicorp/azurerm/latest/docs
- https://learn.microsoft.com/en-us/power-pages/configure/vs-code-extension
- https://learn.microsoft.com/en-us/azure/developer/terraform/configure-azure-virtual-desktop
